My husband first made these delicious Oven Subs several years ago, I have been hooked ever since! We will often have them on a Friday or Saturday evening when we are looking for a simple meal that requires minimal preparation and time.
One of my favourite things about these is the ability to customize the sandwich to suit each person’s individual tastes and wants.
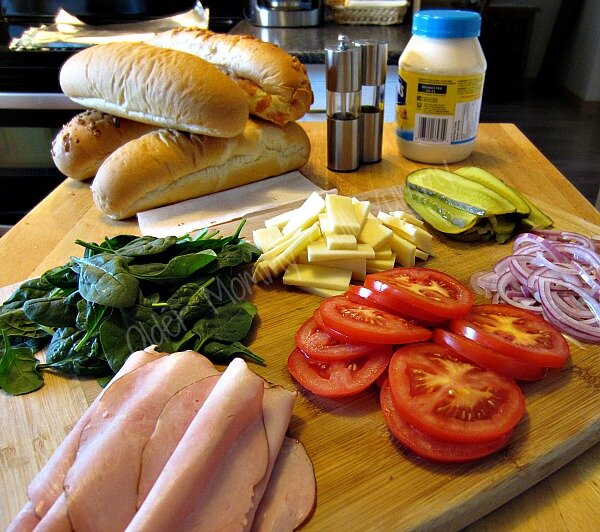
I am not a big meat eater, so I always make mine a “veggie” sub, my husband on the other hand is a meat lover, he always packs on the ham, summer sausage, salami, or turkey…whatever is available!
Some of our favourite toppings include:
- tomatoes
- red onion
- mozzarella cheese
- olives (green or kalamata)
- baby spinach
- dill pickle slices
- ham
- summer sausage
- light Hellman’s mayo
- salt and pepper
Because we heat these subs in a hot oven we don’t add lettuces as we find it gets a little soggy.

But some other popular choices are:
- bell peppers
- banana peppers
- mustard
- jalapeno peppers
- cooked bacon
- cucumbers
- turkey
- salami
- pepperoni
- chicken
- tuna
- lobster
- the options are endless, add whatever you enjoy.
- any melting cheese, such as: Jack, Taleggio, Gruyere, Emmental, Brie, Camembert, Gorgonzola Dolce, Fontina.


Oven Subs
Recipe type: Lunch or a light Supper
Ingredients
- This is what we put in our subs on this particular night, but the combinations are endless!
- 1 - sub roll per person (Plain, cheese, onion, whole wheat etc., whatever your family prefers)
- Hellman's Light Mayo
- Red onion, thinly sliced
- Dill pickle slices
- Tomato slices
- Ham (if using)
- Baby spinach
- Mozzarella cheese, thinly sliced or grated
- Salt and pepper, to taste
Instructions
- Cut sub roll almost in half, but keep two sides attached.
- Spread both sides with mayo (approximately 1 Tbsp.)
- Layer in vegetables (and meat) in any order you wish, topping with cheese.
- Place, filled side up, on a 24 inch long piece of aluminum foil.
- Bring long sides together over sub and roll ends to seal.
- Fold short sides in toward sub to seal.
- Label, if desired
- Put wrapped subs on a sheet pan.
- Place pan in a preheated 400 degree oven for 15 minutes.
- Remove from oven, unwrap, slice in half and enjoy!
I hope you enjoy this quick, easy and delicious meal and as always, if you have any questions at all, please feel free to ask!


Great idea for a quick meal!
Cheers.
Mmm, I am salivating just reading this. We do something similar but use Kaizer rolls…. like your idea better as it would be easier to handle. Already “pinned” it!
I love sandwiches and that one sounds amazing!
These look like an awesome idea!!! Thanks for sharing. :)
I also love making my own subs, like you said you can control what and how much you put on, but the best part is cooking them in the oven the crispiness of the bun and the gooey cheese…ok I just made myself hungry now for an oven sub lol
I know Lynda! The crispy bun and gooey cheese are definitely one of the best parts of these subs!
I LOVE sandwiches! This looks like such a simple easy way to spice up a regular lunch sandwich. Thanks for this!
I love this. I forgot about sub sandwiches. This is a great meal and I love them hot!! Thanks for sharing and the great idea!
You are very welcome Rita, glad you love this idea too!